| Topic Selector Panel | ||
|---|---|---|
 | Topic Editor Page |  |
| NetworkedPlanet | Topic Map Editor |
| Topic Selector Panel | ||
|---|---|---|
| | Topic Editor Page | |
The Topic Selector Panel is a tabbed panel, each tab providing a different way of creating or finding topics in the topic map. The currently selected tab is highlighted in blue, with unselected tabs shown in grey. To switch between tabs, simply click on the label for the tab you want to view. Each tab is described separately below.
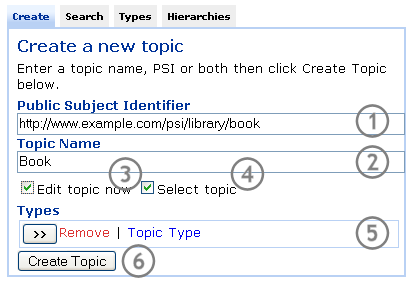
The Create tab allows you to create a topic with an optional name, type and subject identifier.
Subject Identifier field. In this field you may enter a subject identifier for the topic. You may omit a subject identifier for a topic by leaving this field blank.
Topic Name field. In this field you may enter a name for the new topic. You can create a new topic without a name by leaving this field blank.
If a topic has no name, it will be displayed in the Topic Map Editor using its full subject identifier (if it has one) or its database object identifier.
Edit topic now checkbox. If this box is checked, when you click the button, the newly created topic will be displayed in the Topic Editor Panel for further editing.
Select topic checkbox. If this box is checked, when you click the button, the newly created topic will be added to the Selected Topics List as a new selection.
Types topic list box. With this control you can add topics to and remove topics from the list of types for the new topic. Clicking the button adds the current selection in the Selected Topics List as a type. Clicking the Remove link next to a topic in the list will remove the topic from the list of types.
button. When you are happy with the topic name, subject identifier and types, click this button to create the new topic.
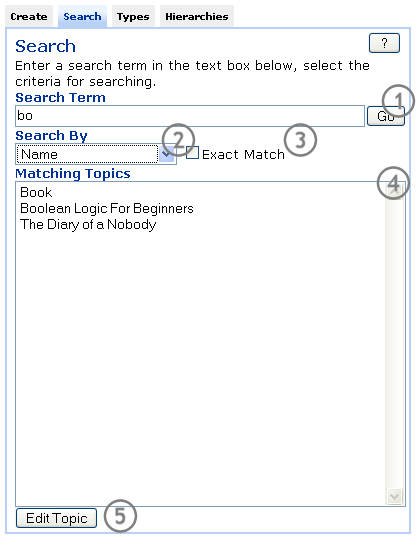
The Search tab allows you to use a text search to locate topics in the topic map.
Search Term field. Enter the term to search for in this field and click the Go button to execute the search. The search results will be displayed in the Matching Topics list box.
Search By selector. From this drop-down list you can choose what property of the topics the search should run against. You can choose from the following:
Subject Identifier - searches against the subject identifiers for topics.
Name - searches against topic base name strings.
Occurrence Value - searches against the value of resources that store their text as part of the topic map.
Occurrence Resources - searches against the URL links specified for occurrences that reference external resources.
Occurrence Resources searches the values of the link URLs, not within the text of the referenced resource.
Exact Match checkbox. If this box is checked then only those topics that have a value that exactly matches the search term will be returned, otherwise all topics that contain the search text anywhere within the searched value will be returned.
Matching Topics List. This list box shows the first 100 topics that match the search criteria.
This button may be used to edit the selected topic as an alternative.
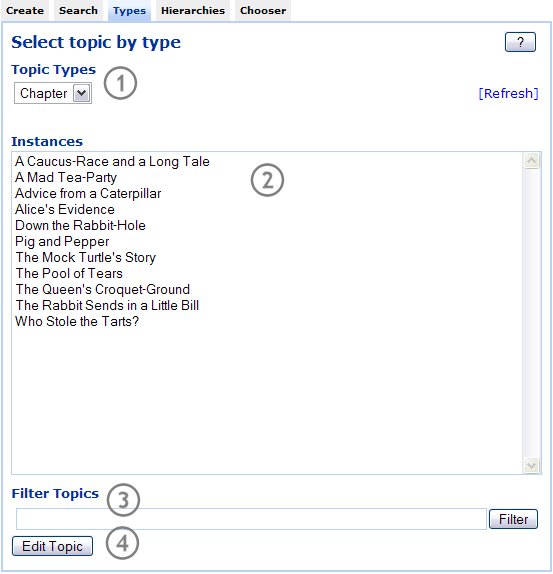
The Types tab allows you to search for topics by their type.
Topic Types list. This drop-down list shows all of the topic types defined in the topic map. The list shows both the topics types defined in the NPCL topic map schema for the topic map.
Instances. This list box shows the topics which are typed by the type selected in the Topic Types list box. Selecting a topic from this list makes it the current selection in the Selected Topics List and adds it to the Selected Topics List history. For performance reasons, this list is limited to 100 results. If the actual number of topics that are typed by the selected topic type exceeds this number are a very large number of topics then a warning will be displayed and the user should use the instance to find the topic they require.
The Filter Topics field may be used to filter the instances displayed in the instance list (3). This is useful when there are too many instances of a topic type for the control to display. To clear a filter, click the button with the text box empty.
Edit Topic button. Click this button to edit the topic currently selected in the Instances list box. The topic to be edited will be displayed in the Topic Editor Panel.
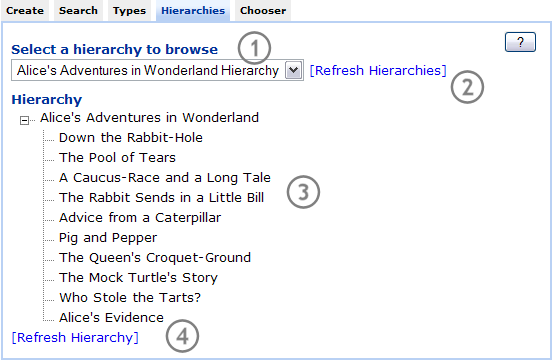
The hierarchies tab allows you to select a hierarchy from the topic map and navigate it. This is useful as a testing tool to see which topics are in a recently defined or changed hierarchy, and also for finding and selecting topics. Clicking on a topic will make it the currently selected topic.
A list of hierarchies defined in the map. As maintaining the state of an entire hierarchy can be a heavy operation in the Topic Map Editor, selecting the first option of Select a hierarchy... will prevent any hierarchy data being loaded.
Clicking this button will repopulate the hierarchy drop down from the topic map.
Shows the hierarchy of topics. Clicking a topic will make it the currently selected topic.
Reloads hierarchy data from the topic map. This is useful if the user has made a change to the topic map and wants to see the updated contents of the hierarchy.
Procedure 10. Create Many Topics Of The Same Type
It is often useful to be able to create several topics of the same type at once.
Ensure that the checkbox labelled Edit topic now is unchecked and that the checkbox labelled Select topic is checked.
Create or select the topic to use as the typing topic for your new topics. Make sure that this topic is the currently selected topic in the Selected Topics List.
Click the button labelled >> to add the currently selected topic as a type for the new topic.
Repeat steps 2 and 3 for each additional type you want assigned to the new topics.
Enter the subject identifier for the new topic in the field labelled Subject Identifier.
If you are entering subject identifiers at this stage, be very careful to change the SI for each topic or you will receive an error if trying to create a topic with the same SI as an existing topic.
Enter the name for the new topic in the field labelled Topic Name.
Click the Create Topic button to create the new topic. The topic will be added to the Selected Topics List and automatically become the selected topic. This way, you will build up the History list in the Selected Topics List to show each of the topics you create.
Repeat steps 5,6 and 7 for each new topic to be created.
| |  | |
| Selected Topics List |  | Topic Editor Panel |