Table of Contents
The NetworkedPlanet Topic Map Editor is a browser-based application that allows power-users and administrators to directly modify the topic maps stored in a TMCore database. The editor also allows users to specify schema information using the NetworkedPlanet Constraint Language (NPCL) which can be used by other applications to provide schema-driven editing interfaces.
This document guides you through the user interface of the Topic Map Editor. For details on installation and configuration of the Topic Map Editor on a server, please refer to the TMCore Installation Guide.
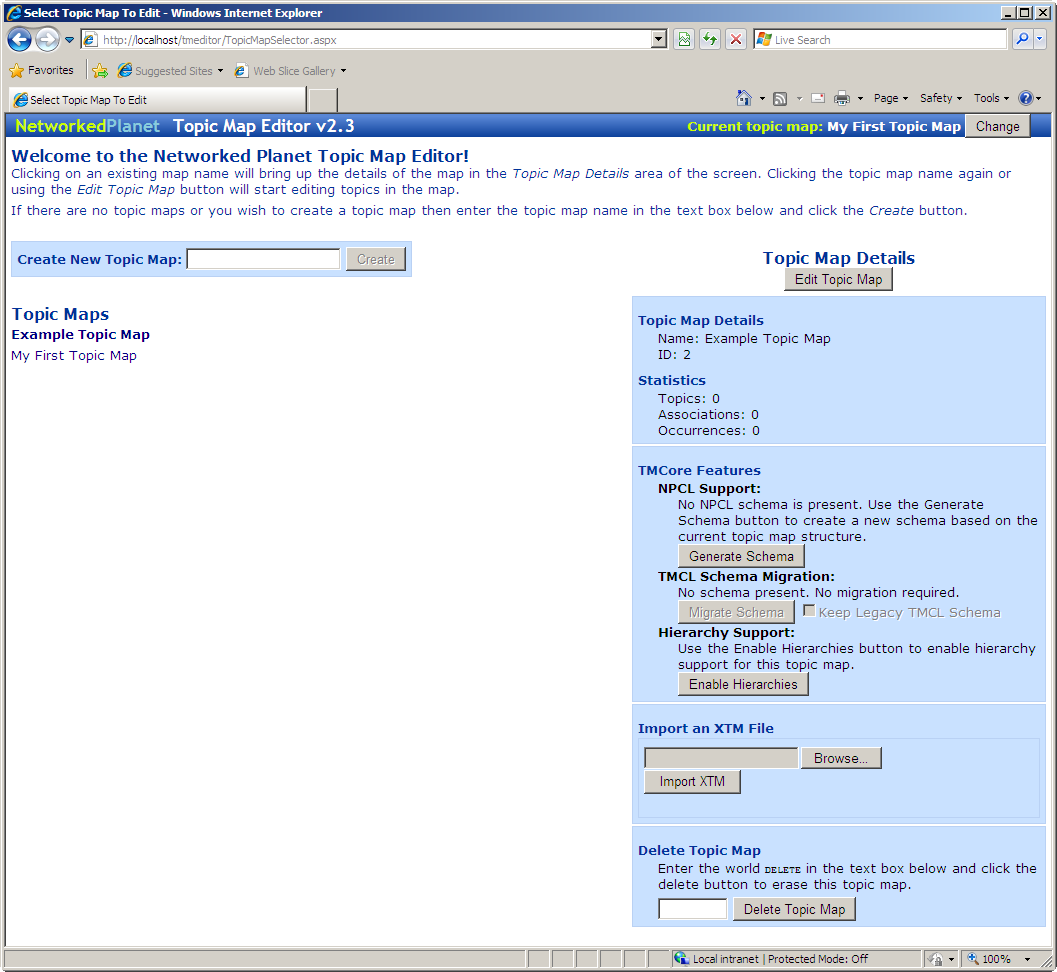
The Topic Map Selector page lists all of the topic maps managed by the TMCore server and allows you to add and remove topic maps from this list as well as to import and export XTM files and enable support for features such as topic hierarchies and the NetworkedPlanet Constraint Language.
On the left side of the page is a list of all of the topic maps in the system and a control allowing you to create a new topic map. On the right side of the page are shown the details of the currently selected topic map. To select a topic map from the left hand list, click on the name of the topic map. When a topic map is selected, the Topic Map Details panel will be enabled and show the statistics for the selected topic map.
Procedure 1. Edit A Topic Map
Select the topic map to edit from the Topic Maps list by clicking on its name. The details of the selected topic map will be shown in the Topic Map Details panel. The selected topic map name will also be highlighted in bold in the list.
Click the button at the topic of the Topic Map Details panel or click the topic map name again. You will be taken to the Topic Editing Page to begin editing the topic map.
Procedure 2. Create A New Topic Map
Enter the name of the new topic map to create in the text field labelled Topic Map Name. The name you enter must be at least one character long and must be different from the existing topic map names.
Click the button. The new topic map will be automatically selected.
Procedure 3. Delete An Existing Topic Map
Select the topic map to be deleted from the Topic Maps list by clicking on its name. The details of the selected topic map will be shown in the Topic Map Details panel.
In the Delete Topic Map section of the Topic Map Details panel, enter the string "DELETE" in the text field and then click the button.
Procedure 4. Import An XTM File Into An Existing Topic Map
Select the topic map that the XTM file should be imported to from the Topic Maps list by clicking on its name. The details of the selected topic map will be shown in the Topic Map Details panel.
Either enter the full path to the file to be imported or click the Browse... button to select the file to be imported from a file selector dialog box.
Click the Import XTM button to upload and import the XTM file. A message will appear informing the user of the success or failure of the import operation.
Procedure 5. Import An XTM File As A New Topic Map
To import an XTM file as a new topic map you must first create the topic map and then import the XTM file into the new topic map:
Enter the name of the new topic map to create in the text field labelled Topic Map Name. The name you enter must be at least one character long and must be different from the existing topic map names.
Click the button.
Either enter the full path to the file to be imported or click the Browse... button to select the file to be imported from a file selector dialog box.
Click the Import XTM button to upload and import the XTM file. A message will appear informing the user of the success or failure of the import operation.
Procedure 6. Enable Support For Creating Hierarchies
Select the topic map that you wish to enable hierarchy support for from the Topic Maps list by clicking on its name. The details of the selected topic map will be shown in the Topic Map Details panel.
Click the button. This will cause the hierarchy schema topics to be loaded in to the topic map. This operation may not be repeated until the hierarchy schema topics are removed.
Procedure 7. Enable Support For The NetworkedPlanet Constraint Language
Select the topic map that you wish to enabled NPCL support for from the Topic Maps list by clicking on its name. The details of the selected topic map will be shown in the Topic Map Details panel. Then either:
Click the button to create the NPCL base types and to generate schema information based on the topics and their associations created in the map OR
Click the button if the topic map contains an existing TMCL schema that you wish to migrate to an NPCL schema. This button will only be enabled if a TMCL schema is detected.
Consult the TMCore user guide for more information on the semantics of these operations.
The Topic Editor Page is the main interface for all topic map editing. The page is split into two main sections. The left-hand section of the screen allows you to view and edit a single topic through a series of tabbed panels providing access to different features of the topic. The right-hand section of the screen is also split into two parts. At the top of the right-hand side is the Selected Topics List, this list acts like a clipboard, allowing you to put the results of searching for topics or creating topics into a list from which you can then select them for editing or for providing topic references when editing another topic. Below the Selected Topics List are a set of tabs providing different ways to access topics in the topic map and a tab to enable quick creation of topics. The diagram below shows all of these main areas of the Topic Editor Page.
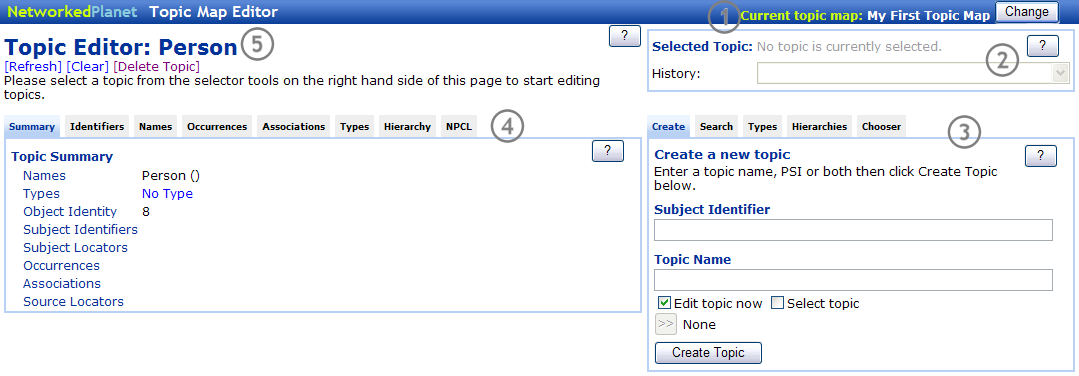
Current topic map display. This provides a visual reminder to the user which topic map they are editing. Clicking the button will return the user to the Topic Map Selector page.
.Selected Topics List. This control shows the history of selected topics as a drop-down list and the most recently selected topic as a link. Clicking on the link allows brings the topic into the main topic editing pane replacing the current topic in that pane.
Topic Selector Panel. This tabbed panel provides access to tools to create new topics, locate topics by search, browse topics by type or browse topics by hierarchies defined in the topic map. Selecting a topic on any of these tabs will add the topic to the Selected Topics List.
Topic Editor Panel. This tabbed panel provides access to all of the information related to a single topic. Each panel provides access to a different kind of information with the exception of the Summary panel which displays an overview of the topic information and allows you to delete the entire topic.
The topic current being edited by the user. Clicking on the topic name will make this topic the currently selected topic (2).
The Selected Topics List shows the currently selected topic and a history list of previously selected topics which you can choose to reinstate as the current selection.

The main purpose of this control is to allow you to add a topic reference in to another topic (for example when creating associations between topics or when specifying a topic type). The current topic selection is shown next to the Selected Topic label. You can select a previously selected topic by choosing that topic from the History drop-down list. You can also edit the currently selected topic by clicking on its name.
Procedure 8. Edit A Topic In The Selected Topics List
If the topic you want to edit is not the currently selected topic, choose the topic from the History drop-down list.
Click the name of the topic after the Selected Topic label to edit that topic.
Procedure 9. Add A Topic To The Selected Topics List
Topics can be added to the Selected Topics List by clicking on a topic from one of the tabs on the Topic Selector Panel.
The Topic Selector Panel is a tabbed panel, each tab providing a different way of creating or finding topics in the topic map. The currently selected tab is highlighted in blue, with unselected tabs shown in grey. To switch between tabs, simply click on the label for the tab you want to view. Each tab is described separately below.
The Create tab allows you to create a topic with an optional name, type and subject identifier.
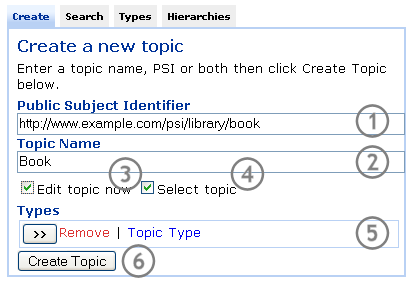
Subject Identifier field. In this field you may enter a subject identifier for the topic. You may omit a subject identifier for a topic by leaving this field blank.
Topic Name field. In this field you may enter a name for the new topic. You can create a new topic without a name by leaving this field blank.
Note
If a topic has no name, it will be displayed in the Topic Map Editor using its full subject identifier (if it has one) or its database object identifier.
Edit topic now checkbox. If this box is checked, when you click the button, the newly created topic will be displayed in the Topic Editor Panel for further editing.
Select topic checkbox. If this box is checked, when you click the button, the newly created topic will be added to the Selected Topics List as a new selection.
Types topic list box. With this control you can add topics to and remove topics from the list of types for the new topic. Clicking the button adds the current selection in the Selected Topics List as a type. Clicking the Remove link next to a topic in the list will remove the topic from the list of types.
button. When you are happy with the topic name, subject identifier and types, click this button to create the new topic.
The Search tab allows you to use a text search to locate topics in the topic map.
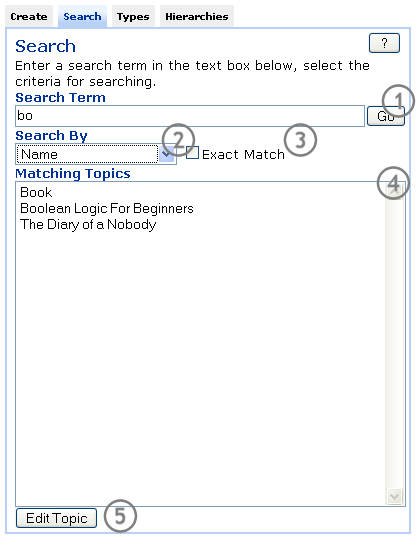
Search Term field. Enter the term to search for in this field and click the Go button to execute the search. The search results will be displayed in the Matching Topics list box.
Search By selector. From this drop-down list you can choose what property of the topics the search should run against. You can choose from the following:
Subject Identifier - searches against the subject identifiers for topics.
Name - searches against topic base name strings.
Occurrence Value - searches against the value of resources that store their text as part of the topic map.
Occurrence Resources - searches against the URL links specified for occurrences that reference external resources.
Note
Occurrence Resources searches the values of the link URLs, not within the text of the referenced resource.
Exact Match checkbox. If this box is checked then only those topics that have a value that exactly matches the search term will be returned, otherwise all topics that contain the search text anywhere within the searched value will be returned.
Matching Topics List. This list box shows the first 100 topics that match the search criteria.
This button may be used to edit the selected topic as an alternative.
The Types tab allows you to search for topics by their type.
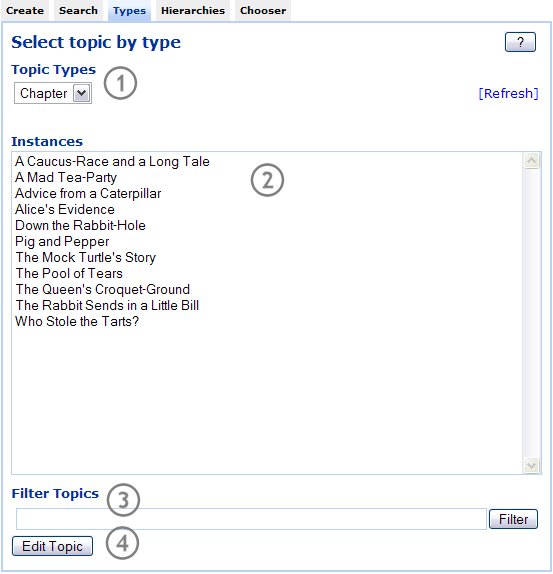
Topic Types list. This drop-down list shows all of the topic types defined in the topic map. The list shows both the topics types defined in the NPCL topic map schema for the topic map.
Instances. This list box shows the topics which are typed by the type selected in the Topic Types list box. Selecting a topic from this list makes it the current selection in the Selected Topics List and adds it to the Selected Topics List history. For performance reasons, this list is limited to 100 results. If the actual number of topics that are typed by the selected topic type exceeds this number are a very large number of topics then a warning will be displayed and the user should use the instance to find the topic they require.
The Filter Topics field may be used to filter the instances displayed in the instance list (3). This is useful when there are too many instances of a topic type for the control to display. To clear a filter, click the button with the text box empty.
Edit Topic button. Click this button to edit the topic currently selected in the Instances list box. The topic to be edited will be displayed in the Topic Editor Panel.
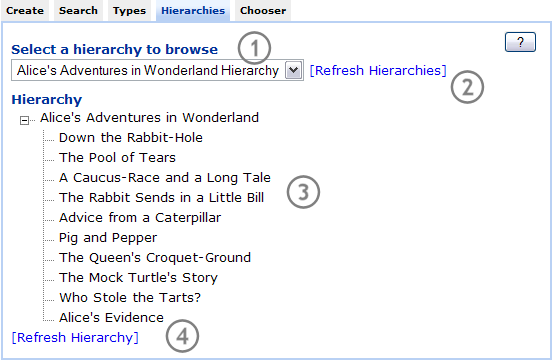
The hierarchies tab allows you to select a hierarchy from the topic map and navigate it. This is useful as a testing tool to see which topics are in a recently defined or changed hierarchy, and also for finding and selecting topics. Clicking on a topic will make it the currently selected topic.
A list of hierarchies defined in the map. As maintaining the state of an entire hierarchy can be a heavy operation in the Topic Map Editor, selecting the first option of Select a hierarchy... will prevent any hierarchy data being loaded.
Clicking this button will repopulate the hierarchy drop down from the topic map.
Shows the hierarchy of topics. Clicking a topic will make it the currently selected topic.
Reloads hierarchy data from the topic map. This is useful if the user has made a change to the topic map and wants to see the updated contents of the hierarchy.
Procedure 10. Create Many Topics Of The Same Type
It is often useful to be able to create several topics of the same type at once.
Ensure that the checkbox labelled Edit topic now is unchecked and that the checkbox labelled Select topic is checked.
Create or select the topic to use as the typing topic for your new topics. Make sure that this topic is the currently selected topic in the Selected Topics List.
Click the button labelled >> to add the currently selected topic as a type for the new topic.
Repeat steps 2 and 3 for each additional type you want assigned to the new topics.
Enter the subject identifier for the new topic in the field labelled Subject Identifier.
Warning
If you are entering subject identifiers at this stage, be very careful to change the SI for each topic or you will receive an error if trying to create a topic with the same SI as an existing topic.
Enter the name for the new topic in the field labelled Topic Name.
Click the Create Topic button to create the new topic. The topic will be added to the Selected Topics List and automatically become the selected topic. This way, you will build up the History list in the Selected Topics List to show each of the topics you create.
Repeat steps 5,6 and 7 for each new topic to be created.
The Topic Editor Panel provides a set of tabs that allow you to browse and edit all of the different characteristics of a topic.
The Summary Tab provides a summary overview of a topic, this summary also shows the unique database identifier assigned to the topic.
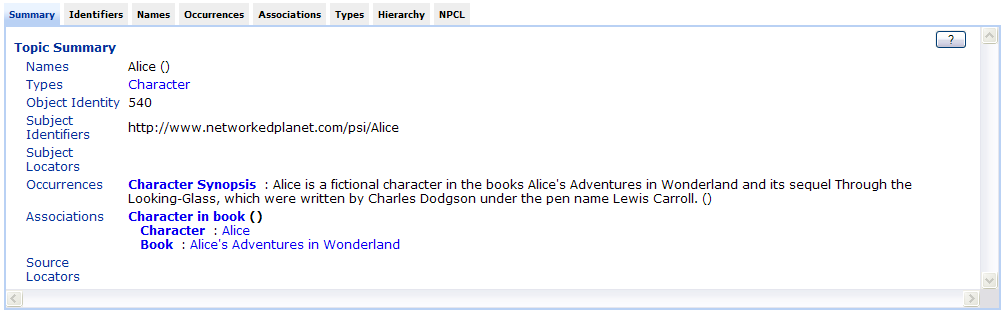
The summary tab provides a description of the topic currently being edited in the editor. Topic data such as source locator information are not shown. The links on this tab behave a little differently from other parts of the editor. Usually clicking a topic will make it the currently selected topic. On the summary tab clicking a topic will cause that topic to be the currently selected topic. The purpose of this is provide a quick and convenient mechanism to navigate around the topic map.
The Topic Map Editor's summary tab can be thought of as the replacement for the Topic Map Navigator application in TMCore05 SP3.
The Identifiers tab allows you to edit the identifiers assigned to a topic. This includes the subject identifiers, subject locators and source locators of the topic.
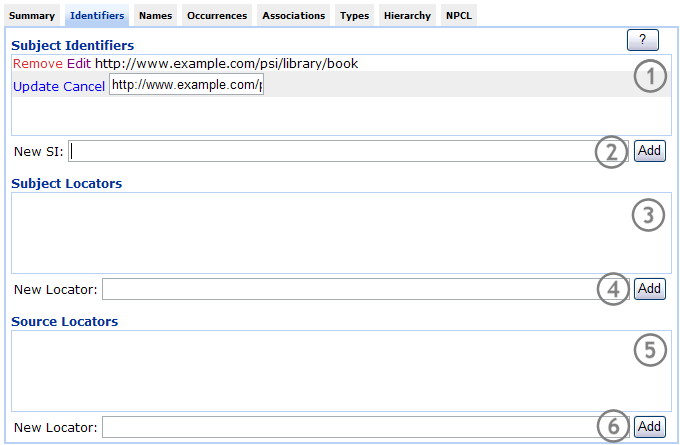
Subject Identifiers list. This list shows the subject identifiers for the topic. To remove a subject identifier from the list, click the red Remove link next to the subject identifier. To edit a subject identifier, click the Edit link. Clicking the Edit link for an entry in this list displays the entry in a text box allowing you to change the value. When you have completed your changes to the entry, click the Update link to save the changes or click Cancel to revert to the old value for the entry.
New Subject Identifier field. To add a new subject identifier to the list, enter the value in this text field and click the Add button.
Subject Locators list. This list shows the subject locators for the topic. You can manipulate this list in exactly the same way as the Subject Identifiers list.
New Subject Locator field. To add a new subject locator to the list, enter the value in the text field and click the Add button.
Source Locators list. This list shows the subject locators for the topic. You can manipulate this list in exactly the same way as the Source Locators list.
New Source Locator field. To add a new source locator to the list, enter the value in the text field and click the Add button.
Creating or editing an identifier for a topic can lead to a topic merge under the following circumstances:
If you add/edit a subject identifier to give it a value that matches that of a subject identifier or source locator of another topic in the topic map.
If you add/edit a subject locator to give it a value that matches that of a subject locator of another topic in the topic map.
If you add/edit a source locator to give it a value that matches that of a subject identifier or source locator of another topic in the topic map.
Under any of these circumstances, the will display a message like the one shown below. You can click on the name of the other topic to display that topic in a separate browser window. If you wish your change to be applied and the merge to go ahead, click the Confirm Merge button, otherwise click the Cancel Merge button to cancel your change and prevent the merge from occurring.

The Names tab allows you to create and modify the base names and variant names of a topic. Elements of this control change depending on whether a name or a variant is selected.
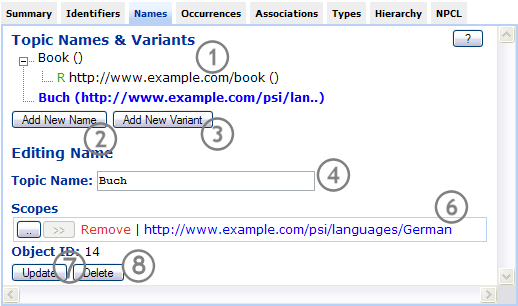
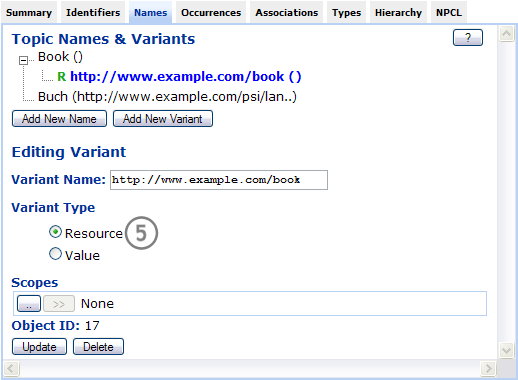
. The topic's base names and variant names are shown in a tree structure. The top level items in the tree are the base names of the topic and their children are the variant names for each base name. Each entry shows the value of the name followed by a list of the topics that define the scope for the name in parentheses. The value of variant names may be either a string or a link to a resource, in the latter case the value displayed is the link URI and this is flagged with a green R to indicate that it is a resource link and not an internal string value. In the screenshot shown above, the topic has three base names and one of the base names has a single variant name which is a link to an icon graphic.
You can select items in this tree by clicking on the item label. The currently selected item is highlighted in blue bold text .
button. Click this button to add a new base name to the topic. The new name is created with a default string value ("New Topic Name") and is made the current selection. You can use the editing controls below the button to modify this new topic name.
button. This button is enabled only if a base name is selected in the control. Click this button to create a new variant name of the selected base name. The new name is created with a default string value ("New Variant") and is made the current selection. You can use the editing controls below the button to modify this new variant name.
Name Value editor. This text field allows you to modify the value of the currently selected base name or variant name. Click the button to save any changes you make or the button to undo your changes and revert to the currently saved value for the name.
Variant Type editor. This radio button control allows you to choose if the variant name value is a link to a resource or an internal string value. Select Resource to treat the value as a link or Value to treat it as an internal string value.
Name Scopes topics list box. With this control you can add topics to and remove topics from the list of scoping topics for the selected base name or variant name. Clicking the button adds the current selection in the Selected Topics List as a scoping topic. Clicking the Remove link next to a topic in the list will remove the topic from the list of scoping topics. Your changes are saved each time you add a topic to or remove a topic from the list.
button. This button updates the currently selected name or variant.
button. This button deletes the currently selected name or variant
The Occurrence tab allows you to create and modify the occurrences of a topic.
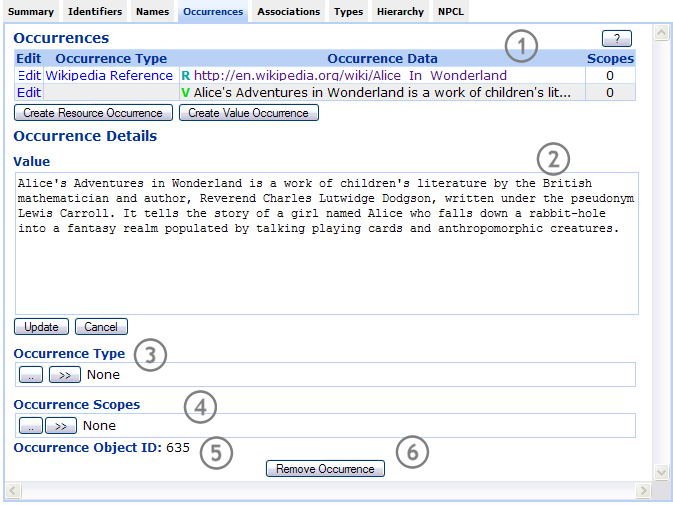
Occurrences Table. This table lists all of the currently defined occurrences of the topic. The table columns show the following information:
- Edit Column
Provides a link to click on to edit the occurrence. Clicking this link selects the topic for editing and displays all the details in the Occurrence Details section of the tab.
- Value Type Column
This column indicates if the occurrence value is an internal string value or a link to an external resource. An internal string value is marked with a "V" in this column. An link to a resource is marked with an "R".
- Value Column
Shows the value of the occurrence. An occurrence value may be either an internal string or a link to an external resource. Note that occurrence values are not truncated, so viewing excessive large values may cause the editor application to become slow to respond.
- Occurrence Type Column
Shows the occurrence type (if any is defined for the occurrence). Clicking this link adds the occurrence type topic to the Selected Topics List control.
- Scopes Column
This column shows a count of the number of scoping topics assigned to the occurrence. To see the full details of the occurrence scope, you must select it using the Edit link provided in the first column - the scope members are then displayed in the Scopes topic list in the Occurrence Details section of the tab.
Contents text field. This field allows you to modify the value of the currently selected occurrence. To save changes made in this field, click the button. To undo the changes made in this field and revert to the previously saved value for the occurrence, click the button.
Type topic selector. With this control you can set the topic that specifies the type of the occurrence. Click the >> button to add the current selection in the Selected Topics List as the typing topic for the occurrence. Click the Remove link next to the topic shown in this control to remove the type. An occurrence can only have a single typing topic, so clicking the >> button to add a new topic will replace any existing topic listed in the field. Your changes will be saved each time you add a topic to or remove a topic from this control.
Scopes topics list box. With this control you can add topics to and remove topics from the list of scoping topics for the selected occurrence. Clicking the button adds the current selection in the Selected Topics List as a scoping topic. Clicking the Remove link next to a topic in the list will remove the topic from the list of scoping topics. Your changes are saved each time you add a topic to or remove a topic from the list.
Occurrence Object ID shows the unique identity TMCore has assigned to this occurrence.
deletes the occurrence from the topic.
The Associations tab allows you to create and modify the associations between this topic and other topics.
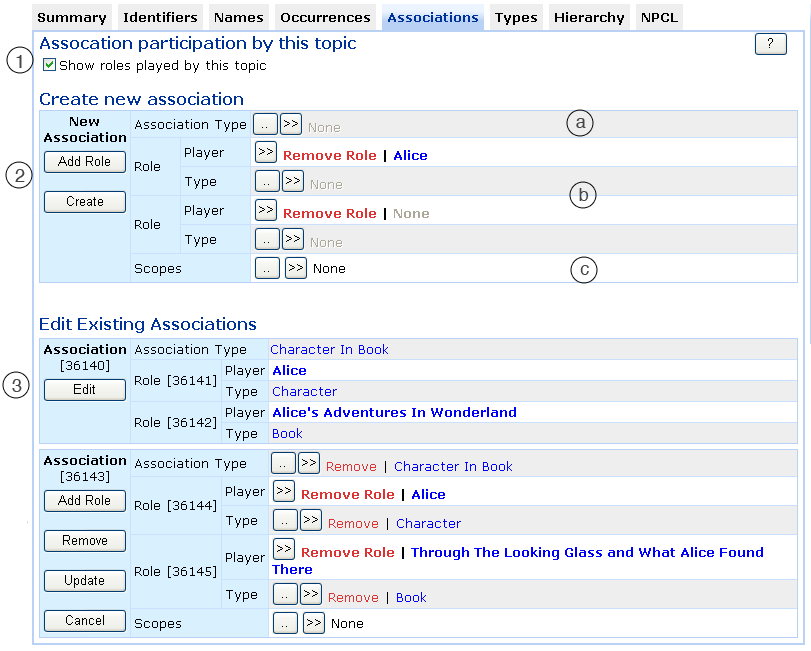
The Show roles played by this topic checkbox allows you to show or hide the roles played by the currently edited topic. As only associations where the topic being edited are shown, it is sometimes useful to hide this information to reduce the amount of screen data.
Below this is the template for creating a new association. This template consists of:
An association type topic holder. To set the type of the association select a topic and click the button. To see a list of NPCL association types defined in this topic map, click the button.
Two rows for each role of the association, one for the role player (shown in bold) and one for the optional role type. Note that the role player has a different remove button: . This is because the association role player must never be empty, therefore if you wish to remove the player you must remove the entire role. You may set the player to a different topic is using the button.
The scope set to which to association applies. To add a topic to scope this association with select a topic and click the button. To see a list of topics that may be used as scoping topics according to the NPCL schema defined in this topic map, click the button.
On the left-hand side of the control are two additional buttons. These are:
button. This may be used to add new roles to the association. Associations typically have 2 roles however this is not required.
button. When you are finished editing the association, click this button to save your changes.
Note that if you remove or change the role for the current topic then and then click the button then the association will seem to disappear. This is because only associations where a role is played by the topic being edited are shown.
Beneath this is a set of tables showing each association between the topic being edited and other topics in the topic map. These tables will only appear if associations exist.
Initially, each association is in "view" mode, i.e. a list of associations is being presented. To edit an association, click the button. In edit mode, the association table shows the same editing controls as the new association template.
To the left of the association being edited are shown four buttons. These are:
button. This will ask the user if they are sure they wish to delete the association. If the user confirms then the association will be removed from the topic.
button. This may be used to add new roles to the association. Associations typically have 2 roles however this is not required.
button. This may be used to commit and changes made to the association back to the topic map.
button. If you have made a mistake or do not wish to commit the changes made to the association back to the topic map then this will discard your changes
The Types tab allows to modify the list of types for a topic.
The only control on this tab is the Topic Types topic list box. With this control you can add topics to and remove topics from the list of types for the topic. Clicking the button adds the current selection in the Selected Topics List as a type for the topic. Clicking the Remove link next to a topic in the list will remove the topic from the list of types. Your changes are saved each time you add a topic to or remove a topic from the list.
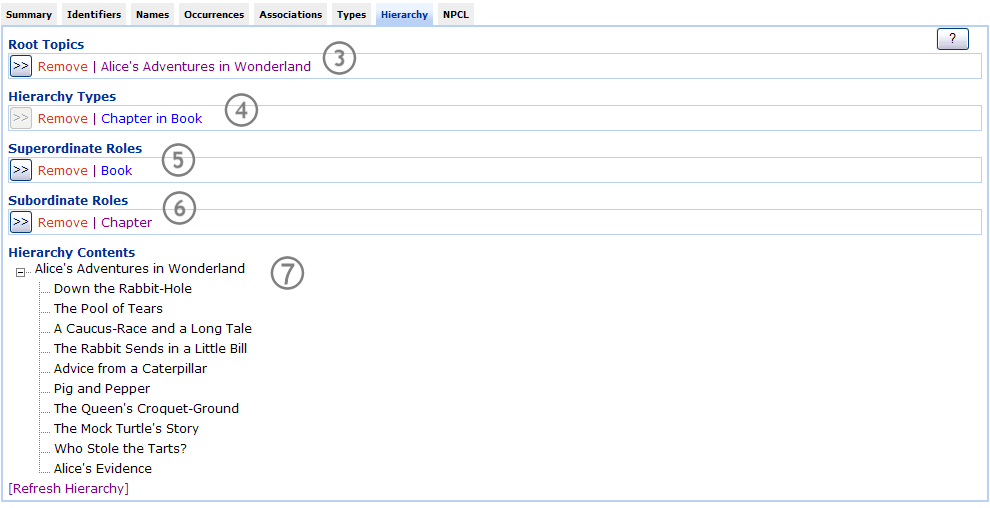
The Hierarchies Tab allows you to view and modify the hierarchy defined by a topic or to use the current topic to define a new hierarchy in the topic map.


This message is shown when the hierarchy schema topics are not loaded in to the topic map. Clicking the button will create the topics required to support hierarchies. This action is equivalent to clicking the button on the topic map details control.
In order for a topic to represent a hierarchy, it must be an instance of the topic with SI http://www.techquila.com/psi/faceted-classification/#facet topic. Clicking the button T
Root Topics topic list. With this control you can add topics to and remove topics from the list of root topics for the hierarchy. The root topics are the top level items from which the hierarchy is built. Clicking the button adds the current selection in the Selected Topics List as a root topic for the hierarchy. Clicking the Remove link next to a topic in the list will remove the topic from the list of root topics. Your changes are saved each time you add a topic to or remove a topic from the list.
Hierarchy Types topic list. This control lists the association types that are traversed to construct the hierarchy. Clicking the button adds the current selection in the Selected Topics List as a hierarchy type. Clicking the Remove link next to a topic in the list will remove the topic from the list of root topics. Your changes are saved each time you add a topic to or remove a topic from the list.
Superordinate Roles topic list. This control lists the role types that define the "parent" topic in each association traversed to construct the hierarchy. Clicking the button adds the current selection in the Selected Topics List as a superordinate role type. Clicking the Remove link next to a topic in the list will remove the topic from the list of superordinate role types. Your changes are saved each time you add a topic to or remove a topic from the list.
Subordinate Roles topic list. This control lists the role types that define the "child" topic in each association traversed to construct the hierarchy. Clicking the button adds the current selection in the Selected Topics List as a subordinate role type. Clicking the Remove link next to a topic in the list will remove the topic from the list of subordinate role types. Your changes are saved each time you add a topic to or remove a topic from the list.
Hierarchy Contents tree control. This tree control shows the contents of the hierarchy. To update this tree after making changes in any of the controls listed above, click the button.
See also How To Create A Topic Hierarchy.
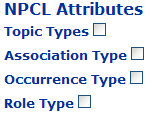
The NPCL tab allows you to change the NPCL attributes of the topic. See the Engine API Guide for more information about NPCL. This tab allows the user to configure the topic within the context of NPCL as:
A topic type, so that other topics may be an instance of this topic.
An association type. So that this topic may be used to type associations.
An occurrence type, so that this topic may be used to type occurrences attached to topics.
A role type, so that this topic may be used to define a role type in an association.
It is important to note the NPCL schema is not enforced by the Topic Map Editor (because the editor aims to be a generic topic map editing application). So you will not be prevented or warned from breaking NPCL schema constraints. It is also important to note that NPCL requires an topic participating in the schema definition to have at least one Subject Identifier associated with it. Refer to the section called “Identifiers Tab” for information on how to do this.
Each of these facilities is enabled by clicking the relevant checkbox. Each will be explained in the following sections.
Once a topic has been selected to be an NPCL topic type you are able to configure various aspects of the topic type.

Use these checkboxes to allow instances of this topic to scope Names, Occurrences and Associations.
Occurrence constraints allow the user to specify constraints set on occurrences created on instances of this topic type. You may restrict the types of occurrence created on instances as well as minimum and maximum number instance of that occurrence type for the topic to comply with the schema. Note that the button will only be enabled one an instance of an NPCL occurrence is placed in to the topic holder.
The Role Player constraints may be placed on instances of this topic. These operate in a similar way to the occurrence type constraint table. Select a topic representing an association role in which instances of this topic may act. You may also select an association type but this is not required.
Once a topic has been selected to be an NPCL association type you are able to configure the constraints of instances of this association type.

Shows a list of the existing role constraints for instances of this association type.
Shows a new association constraint being created. To enable the button a valid NPCL Role Type topic must be selected. To see a list of the choices available, use the button provided. Enter the minimum and maximum cardinality values for this constraint and click the button to create the constraint.
NPCL Occurrence Types allow the user to place constraints on occurrences where the occurrence type topic is set to the topic being edited. The interpretation of the values of the attributes of occurrence types is up to the using application and are not prescribed by NPCL.

The data type field a data type specification for this type.
The min value field specifies a minimum value that the occurrence value should have.
The max value field specifies a maximum value that the occurrence value should have.
The value pattern field specifies a regular expression string that values of this occurrence must match.

This section contains some simple "How To" style guides to perform common tasks in the Topic Map Editor.
Procedure 11. Create A New Topic
In the Topic Selector Panel, choose the Create Tab.
Enter a subject identifier URI in the field labelled Subject Identifier.
Enter a name for the topic in the field labelled Topic Name.
Add one or more typing topics to using the topics list control labelled type. You add the topics from the Selected Topics List control.
Note
You can switch to the other tabs in the Topic Selector Panel to find the typing topics to be added. The name, subject identifier and type information you have already entered on the Create tab will be preserved.
Check the Edit topic now check box if you wish to immediately add more information to the new topic.
Check the Select Topic checkbox if you wish to add the new topic to the Topic Selector Panel.
Click the Create button to create the new topic.
Procedure 12. Edit An Existing Topic
Locate the topic. If you know the name, SI, occurrence resource or occurrence value of the topic then use the Search Tab, enter part of, or the entire name or PSI of the topic.
Select the relevant value from the drop down box showing a list of searchable topic attributes.
If an exact match is required, ensure that the checkbox is selected.
Click the button, or press the enter key with the focus in the text box next to the button.
A set of topics that matched the search expression. Note that the topics will be shown by their display name, not by the value you searched for.
To edit the topic either double click on the desired topic, or single click the topic to select it and click the button or click the topic name as shown in the Selected Topic control on the topic right of the Topic Map Editor display.
Procedure 13. Edit a topic by ID or link someone to a specific page in TMEditor
Clicking the link button in TMEditor will reload the TMEditor page using URL parameters to define:
The Topic Map being edited, which is the
tmparameter.The Topic ID being edited, which is the the
tparameter.The index of the tab on the edit pane (left), which is the
etiparameter.The indx of the tab on the search pane (right), which is the
stiparameter.
Please note that tab index information is not set correctly when using the button in Internet Explorer (all versions), however if you specify tab information in the URL it will be honoured.
It follows that if you know the topic map ID and topic ID that you are trying to edit then you can:
Click to set the URL to the topic map, topic ID and tab information in the address bar of the browser.
Edit the value of the
tparameter to pick a specific topic to edit.If you want to send someone a link to a specific topic editing pane in TMEditor you can send them the full URL.
Procedure 14. Create A Topic Hierarchy
To create a hierarchy in a topic map, you need to first decide on the following:
The name of the hierarchy. This is separate from the name of the root topic(s) of the hierarchy. For example the hierarchy "Geographical Regions" might have the root topic "The World".
The root topic or root topics of the hierarchy. These are the top-level starting points for building the hierarchy. You may specify multiple root topics for a hierarchy and each one will provide a separate top-level branch of the hierarchy.
The association type or types used to construct the hierarchy. These are the association types that are traversed from the root topic(s) of the hierarchy to find the hierarchy members. You must also decide, for each association type which role is played by the "parent" (the superordinate role type) and which is played by the "child" (the subordinate role type). For example the "Geographical Regions" hierarchy might use the association type "Region Contains Region" with the parent role being "Container" and the child role "Contained".
If you haven't already done so, create topics for the association type(s) and superordinate and subordinate role type(s).
Create a topic for each root of the hierarchy.
Create a topic for the hierarchy itself (we shall call this the "hierarchy topic").
With the hierarchy topic still selected for editing, go to the "Hierarchies" tab.
Using the Topic Selector Panel, select the root topic(s) of the hierarchy and add them one at a time to the Root Topics topic list control.
Using the Topic Selector Panel, select the association type(s) for the hierarchy and add them one at a time to the Hierarchy Types topic list control. Then add the "parent" role types to the Superordinate Roles topic list control and the "child" role types to the Subordinate Roles topic list control.
Click the Refresh Hierarchy button to update the tree display of the hierarchy. If your root topic(s) are already associated to some child topics, you should see them appear in the tree display.
Procedure 15. Create A Topic Map Schema
Creating a schema for a topic map is primarily a process of requirements analysis and domain analysis to work out exactly what types are needed to represent the information your applications will work with. This process of analysis is beyond the scope of this document. Instead we will assume that you have already drawn up a list of the topic types, association types and occurrence types you want to have in your schema. For a full overview of the Networked Planet Constraint Language (NPCL), please refer to the Engine API Guide.
Enter the basic type information. For each topic type, association type, role type and occurrence type identified in your schema
Create a topic for the type. You MUST assign this topic at least one subject identifier on the Identifiers tab and you SHOULD also assign the topic at least one base name using the Names tab.
Set the meta-type information. Go to the NPCL tab in the Topic Editor Panel and check all of the boxes that apply to this topic. We strongly recommend that each topic should only ever be used as a single meta-type - i.e. try to avoid creating a single topic which is both a Topic Type and an Occurrence Type or some other combination of meta-types.
For now, don't fill in the detailed information for the meta-type.
In the Topic Selector Panel, switch to the Types tab. This is the best tab for quickly listing all of your types as you can simply select the appropriate meta-type from the drop-down list.
Create Association Role Constraints.
From the drop-down list in the Types tab of the Topic Selector Panel, select "Association Type".
Select the first item in the list and then click on the item in the Selected Topics List control to bring it into the topic editor.
From the drop-down list in the Types tab of the Topic Selector Panel, select "Role Type".
Select one of the role types allowed by this association type and click the >> button to add the type to a new role player constraint.
Enter the minimum and maximum cardinality (the number of times that a role of this type should appear in an association of the constrained type).
Enter the arc label string for the role. This is the default label to use to present the association information when seen from the point of view of the player of this role. For example, if your association type is "Employment" and the role types are "Employee" and "Employer", the arc label for the "Employee" role would be "Works For" and the arc label for the "Employer" role would be "Employs".
Click the "Add" button to add this role player constraint to the association type.
Repeat steps (d) to (g) for each role type allowed by the association type.
Repeat steps (a) to (h) for each association type in your schema.
Create Occurrence Constraints.
From the drop-down list in the Types tab of the Topic Selector Panel, select "Topic Type".
Select the first item in the list and then click on the item in the Selected Topics List control to bring it into the topic editor.
From the drop-down list in the Types tab of the Topic Selector Panel, select "Occurrence Type".
Select one of the occurrence types allowed by this topic type and click the >> button under the New Occurrence Type Constraint section of the NPCL tab.
Enter the minimum and maximum cardinality for this occurrence type (the number of times that an occurrence of this type may appear on a topic of the constrained type).
Click the "Add" button to add this occurrence constraint to the topic type.
Repeat steps (d) to (f) for each occurrence type allowed by the topic type.
Repeat steps (a) to (g) for each topic type in your schema.
Create Role Player Constraints
From the drop-down list in the Types tab of the Topic Selector Panel, select "Topic Type".
Select the first item in the list and then click on the item in the Selected Topics List control to bring it into the topic editor.
From the drop-down list in the Types tab of the Topic Selector Panel, select "Role Type".
Select one of the role types that can be played by this topic type and click the >> button on the "Role" row under the New Role Type Constraint section of the NPCL tab.
From the drop-down list in the Types tab of the Topic Selector Panel, select "Association Type"; select the association type that the topic can play the specified role in; and click the >> button on the "Association" row under the New Role Type Constraint section of the NPCL tab.
Enter the minimum and maximum cardinality for this role player constraint type (the number of times that a topic of the constrained type can play the specified type of role in the specified type of association).
Click the "Add" button to add this role player constraint to the topic type.
Repeat steps (c) to (g) for each type of role that can be played by the topic type.
Repeat steps (a) to (h) for each topic type in your schema.
This section outlines some of the common problems that you may encounter when using the Topic Map Editor and how to mitigate them.
When a problem occurs in TMEditor a description of the error is
printed on the browser window, however this is generally just an
overview and may not contain enough information to identify the root
cause of a problem. To assist with problem diagnosis TMEditor attempts
to write trace information using the log4net framework. The default
configuration file is contained in the
log4net.config file, located in the root of the
TMEditor web application directory. By default this will attempt to
write trace entries to a rolling log named
currentLog in the TMEditor root web application
directory. If the log is not appearing then the most likely cause is
that the ASPNET user (or which username is in use by the
ASP.NET framework) does not have permission to write to this directory.
Once write permission is granted the log should start being
written.
This section shows some of the common configuration issues that may result in Topic Map Editor not working correctly.
This error may occur if the database configuration is altered in such a way that the network connection between IIS and MS-SQL is broken. Provided that the change does not affect the correct functioning of the Topic Map Editor (for example, removing the ASPNET user from the list of allowed logins to the database) this should correct the problem.
This most commonly occurs just after a TMCore installation has
been completed and Topic Map Editor is configured to use SSPI for
authentication. By default the TMCore database (typically named
topicmap does not create a login for the user
that is being used by IIS to execute the Topic Map Editor code. This
user, unless otherwise configured by the IIS administrator is
ASPNET (or IUSR_machine
name on Windows Server 2003). To resolve
this problem add the ASPNET (or
IUSR_machine_name)
user to MS-SQL and grant it the tm_reader and
tm_writer roles to the TMCore database. If you
are not using this configuration, consult the IIS and MS-SQL
documentation for more information on how to integrate these.
This may happen occasionally, usually in Internet Explorer, after the button on the web browser has been used. This is a known issue with ASP.NET v1.1 and we are investigating the cause and a possible fix. To work around this, reload the Topic Map Editor. In Firefox this may be achieved by clicking the button on under the topic editor heading. In Internet Explorer restart the Topic Map Editor application in a new Internet Explorer window.