Getting Started
The standard Web3 platform installation is provided in two separate ZIP files, one for 32-bit systems named Web3_{version}_x86.zip, the other for 64-bit systems named Web3_{version}_x64.zip. To begin the installation process, extract the contents of the ZIP file that is appropriate for your system to a temporary directory. Enter that directory and go to the sub-directory named Web3. In that directory, double-click on the setup.exe file to run the installer.
.NET 4.0 Pre-Requisite Check
The installer will initially check that .NET 4.0 is available on the local machine and if not it will start the process of downloading and installing .NET 4.0. After the .NET 4.0 installation is complete a machine reboot is usually required, if you are prompted to reboot the machine you should do so when prompted as the Web3 platform will require that .NET 4.0 is fully installed. After the reboot, the installation process should automatically restart when you log in, if it fails to do so, locate the setup.exe file and run it again - this time the .NET 4.0 installation should be skipped and you will proceed to the main installation process.
Web3 Installation
When the Web3 setup runs use the Next and Back buttons to navigate through the installation process. The installation process includes the normal splash-screen and license dialogs. The following text describes the other, custom dialogs that you will see during the installation process.
Choose Setup Type

Click on Single Server for a full server installation including database creation. If the Web3 database is already installed on this or another machine and you want to use that existing database, click on the Front-End Server option.
SQL Server Information Dialog

Enter the name of the SQL Server instance where the Web3 databases are to be created. If the databases are to be installed on the local machine you can use "localhost" as the Server Name. With Use Integrated Security checked, the installer will use the account you are logged in as to connect to the server and create the databases. Alternatively you may uncheck Use Integrated Security and provide a SQL Server user name and password (NOT a Windows user account) to use SQL Server authentication instead.
Service Accounts Dialog
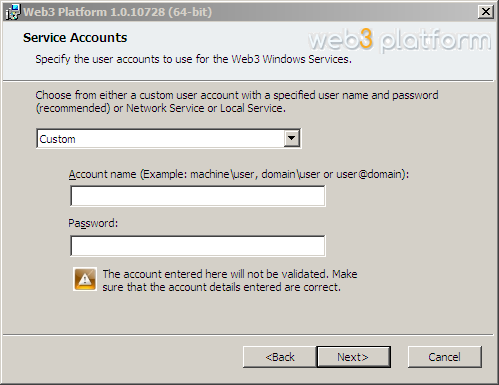
This dialog prompts you for the user name and password of a user account that will be used to run the Web3 Platform Windows Services. You can choose to use either one of the built-in service accounts, Local Service or Network Service, or you can enter a custom account identity. If entering a custom account name, the account name must be entered with a machine or domain name qualifier, so if the user is a local machine user, enter [MACHINE NAME]\[USER NAME]. If the user account is a domain user enter [DOMAIN NAME]\[USER NAME]. This account will be used to access the Web3 database, and to run the local Web3 services and Web3 IIS application pool so if the database is located on another machine you must use a domain user account.
Web Application Account Dialog
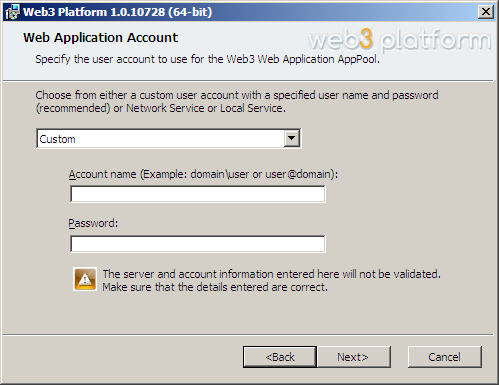
This dialog prompts you for the user name and password of a user account that will be used to run the Web3 Platform web application. You can choose to use either one of the built-in service accounts, Local Service or Network Service, or you can enter a custom account identity. If entering a custom account name, the account name must be entered with a machine or domain name qualifier, so if the user is a local machine user, enter [MACHINE NAME]\[USER NAME]. If the user account is a domain user enter [DOMAIN NAME]\[USER NAME]. This account will be used to access the Web3 database, and to run the local Web3 services and Web3 IIS application pool so if the database is located on another machine you must use a domain user account.
Web Application Registration
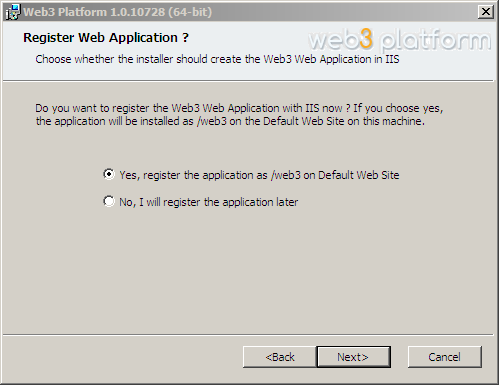
In this dialog you choose if you want to install the Web3 web service at the default location automatically or manually install it. If you answer "Yes" to this question, a virtual directory called web3 will be created in IIS under the Default web site and mapped to the Web3 service installation directory. If you wish to host the web application on a different IIS website or at some other location in the default website, you should answer "No" to this question and then manually map the Web3 application into IIS.