| Topic Editor Panel | ||
|---|---|---|
 | Topic Editor Page |  |
| NetworkedPlanet | Topic Map Editor |
| Topic Editor Panel | ||
|---|---|---|
| | Topic Editor Page | |
The Topic Editor Panel provides a set of tabs that allow you to browse and edit all of the different characteristics of a topic.
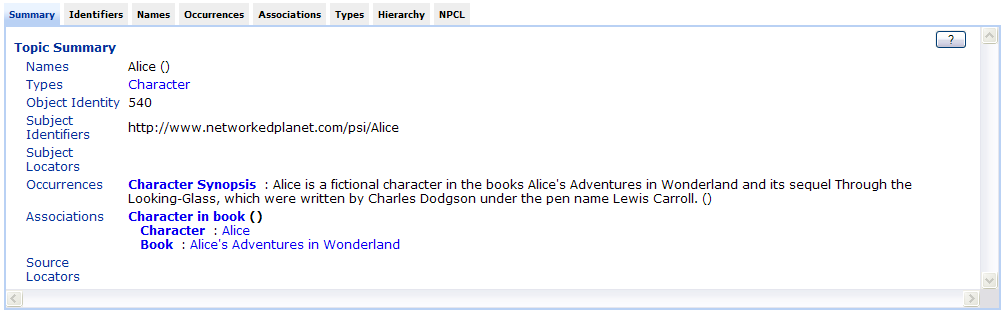
The Summary Tab provides a summary overview of a topic, this summary also shows the unique database identifier assigned to the topic.
The summary tab provides a description of the topic currently being edited in the editor. Topic data such as source locator information are not shown. The links on this tab behave a little differently from other parts of the editor. Usually clicking a topic will make it the currently selected topic. On the summary tab clicking a topic will cause that topic to be the currently selected topic. The purpose of this is provide a quick and convenient mechanism to navigate around the topic map.
The Topic Map Editor's summary tab can be thought of as the replacement for the Topic Map Navigator application in TMCore05 SP3.
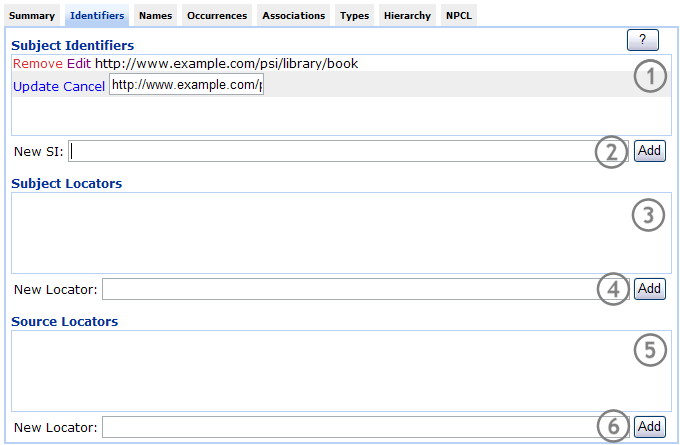
The Identifiers tab allows you to edit the identifiers assigned to a topic. This includes the subject identifiers, subject locators and source locators of the topic.
Subject Identifiers list. This list shows the subject identifiers for the topic. To remove a subject identifier from the list, click the red Remove link next to the subject identifier. To edit a subject identifier, click the Edit link. Clicking the Edit link for an entry in this list displays the entry in a text box allowing you to change the value. When you have completed your changes to the entry, click the Update link to save the changes or click Cancel to revert to the old value for the entry.
New Subject Identifier field. To add a new subject identifier to the list, enter the value in this text field and click the Add button.
Subject Locators list. This list shows the subject locators for the topic. You can manipulate this list in exactly the same way as the Subject Identifiers list.
New Subject Locator field. To add a new subject locator to the list, enter the value in the text field and click the Add button.
Source Locators list. This list shows the subject locators for the topic. You can manipulate this list in exactly the same way as the Source Locators list.
New Source Locator field. To add a new source locator to the list, enter the value in the text field and click the Add button.
Creating or editing an identifier for a topic can lead to a topic merge under the following circumstances:
If you add/edit a subject identifier to give it a value that matches that of a subject identifier or source locator of another topic in the topic map.
If you add/edit a subject locator to give it a value that matches that of a subject locator of another topic in the topic map.
If you add/edit a source locator to give it a value that matches that of a subject identifier or source locator of another topic in the topic map.
Under any of these circumstances, the will display a message like the one shown below. You can click on the name of the other topic to display that topic in a separate browser window. If you wish your change to be applied and the merge to go ahead, click the Confirm Merge button, otherwise click the Cancel Merge button to cancel your change and prevent the merge from occurring.
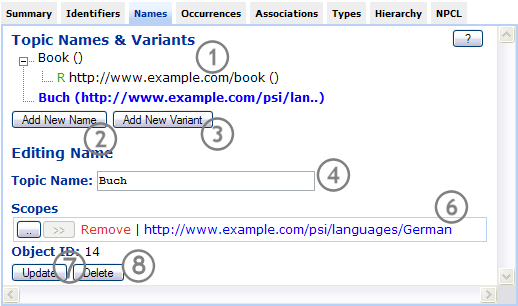
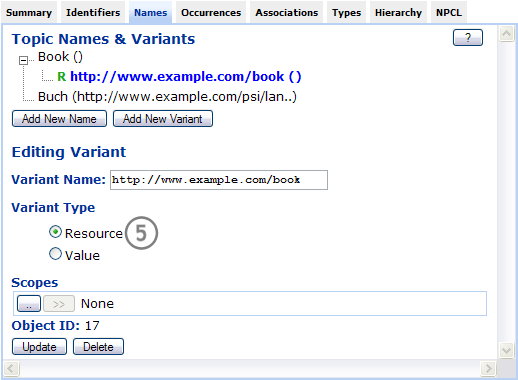
The Names tab allows you to create and modify the base names and variant names of a topic. Elements of this control change depending on whether a name or a variant is selected.
. The topic's base names and variant names are shown in a tree structure. The top level items in the tree are the base names of the topic and their children are the variant names for each base name. Each entry shows the value of the name followed by a list of the topics that define the scope for the name in parentheses. The value of variant names may be either a string or a link to a resource, in the latter case the value displayed is the link URI and this is flagged with a green R to indicate that it is a resource link and not an internal string value. In the screenshot shown above, the topic has three base names and one of the base names has a single variant name which is a link to an icon graphic.
You can select items in this tree by clicking on the item label. The currently selected item is highlighted in blue bold text .
button. Click this button to add a new base name to the topic. The new name is created with a default string value ("New Topic Name") and is made the current selection. You can use the editing controls below the button to modify this new topic name.
button. This button is enabled only if a base name is selected in the control. Click this button to create a new variant name of the selected base name. The new name is created with a default string value ("New Variant") and is made the current selection. You can use the editing controls below the button to modify this new variant name.
Name Value editor. This text field allows you to modify the value of the currently selected base name or variant name. Click the button to save any changes you make or the button to undo your changes and revert to the currently saved value for the name.
Variant Type editor. This radio button control allows you to choose if the variant name value is a link to a resource or an internal string value. Select Resource to treat the value as a link or Value to treat it as an internal string value.
Name Scopes topics list box. With this control you can add topics to and remove topics from the list of scoping topics for the selected base name or variant name. Clicking the button adds the current selection in the Selected Topics List as a scoping topic. Clicking the Remove link next to a topic in the list will remove the topic from the list of scoping topics. Your changes are saved each time you add a topic to or remove a topic from the list.
button. This button updates the currently selected name or variant.
button. This button deletes the currently selected name or variant
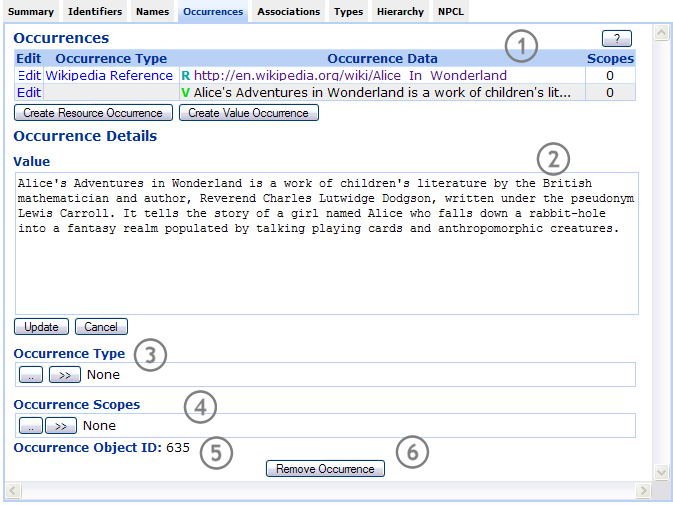
The Occurrence tab allows you to create and modify the occurrences of a topic.
Occurrences Table. This table lists all of the currently defined occurrences of the topic. The table columns show the following information:
Provides a link to click on to edit the occurrence. Clicking this link selects the topic for editing and displays all the details in the Occurrence Details section of the tab.
This column indicates if the occurrence value is an internal string value or a link to an external resource. An internal string value is marked with a "V" in this column. An link to a resource is marked with an "R".
Shows the value of the occurrence. An occurrence value may be either an internal string or a link to an external resource. Note that occurrence values are not truncated, so viewing excessive large values may cause the editor application to become slow to respond.
Shows the occurrence type (if any is defined for the occurrence). Clicking this link adds the occurrence type topic to the Selected Topics List control.
This column shows a count of the number of scoping topics assigned to the occurrence. To see the full details of the occurrence scope, you must select it using the Edit link provided in the first column - the scope members are then displayed in the Scopes topic list in the Occurrence Details section of the tab.
Contents text field. This field allows you to modify the value of the currently selected occurrence. To save changes made in this field, click the button. To undo the changes made in this field and revert to the previously saved value for the occurrence, click the button.
Type topic selector. With this control you can set the topic that specifies the type of the occurrence. Click the >> button to add the current selection in the Selected Topics List as the typing topic for the occurrence. Click the Remove link next to the topic shown in this control to remove the type. An occurrence can only have a single typing topic, so clicking the >> button to add a new topic will replace any existing topic listed in the field. Your changes will be saved each time you add a topic to or remove a topic from this control.
Scopes topics list box. With this control you can add topics to and remove topics from the list of scoping topics for the selected occurrence. Clicking the button adds the current selection in the Selected Topics List as a scoping topic. Clicking the Remove link next to a topic in the list will remove the topic from the list of scoping topics. Your changes are saved each time you add a topic to or remove a topic from the list.
Occurrence Object ID shows the unique identity TMCore has assigned to this occurrence.
deletes the occurrence from the topic.
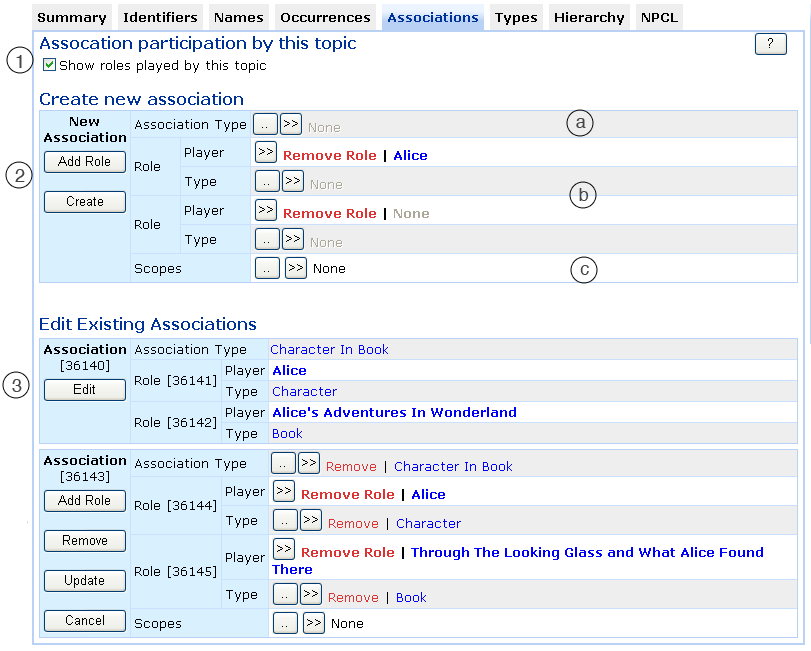
The Associations tab allows you to create and modify the associations between this topic and other topics.
The Show roles played by this topic checkbox allows you to show or hide the roles played by the currently edited topic. As only associations where the topic being edited are shown, it is sometimes useful to hide this information to reduce the amount of screen data.
Below this is the template for creating a new association. This template consists of:
An association type topic holder. To set the type of the association select a topic and click the button. To see a list of NPCL association types defined in this topic map, click the button.
Two rows for each role of the association, one for the role player (shown in bold) and one for the optional role type. Note that the role player has a different remove button: . This is because the association role player must never be empty, therefore if you wish to remove the player you must remove the entire role. You may set the player to a different topic is using the button.
The scope set to which to association applies. To add a topic to scope this association with select a topic and click the button. To see a list of topics that may be used as scoping topics according to the NPCL schema defined in this topic map, click the button.
On the left-hand side of the control are two additional buttons. These are:
button. This may be used to add new roles to the association. Associations typically have 2 roles however this is not required.
button. When you are finished editing the association, click this button to save your changes.
Note that if you remove or change the role for the current topic then and then click the button then the association will seem to disappear. This is because only associations where a role is played by the topic being edited are shown.
Beneath this is a set of tables showing each association between the topic being edited and other topics in the topic map. These tables will only appear if associations exist.
Initially, each association is in "view" mode, i.e. a list of associations is being presented. To edit an association, click the button. In edit mode, the association table shows the same editing controls as the new association template.
To the left of the association being edited are shown four buttons. These are:
button. This will ask the user if they are sure they wish to delete the association. If the user confirms then the association will be removed from the topic.
button. This may be used to add new roles to the association. Associations typically have 2 roles however this is not required.
button. This may be used to commit and changes made to the association back to the topic map.
button. If you have made a mistake or do not wish to commit the changes made to the association back to the topic map then this will discard your changes
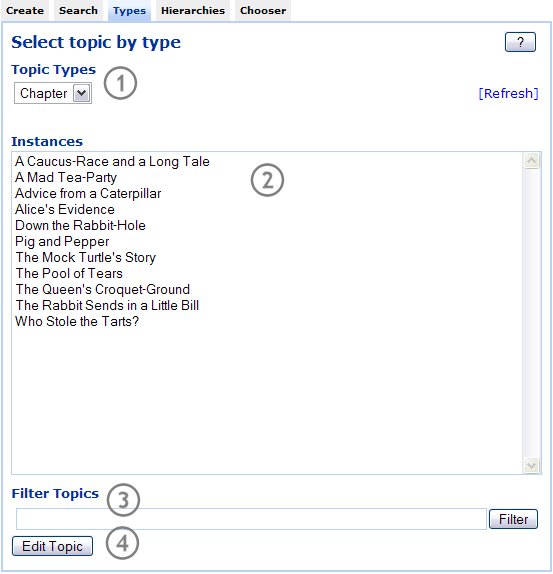
The Types tab allows to modify the list of types for a topic.
The only control on this tab is the Topic Types topic list box. With this control you can add topics to and remove topics from the list of types for the topic. Clicking the button adds the current selection in the Selected Topics List as a type for the topic. Clicking the Remove link next to a topic in the list will remove the topic from the list of types. Your changes are saved each time you add a topic to or remove a topic from the list.
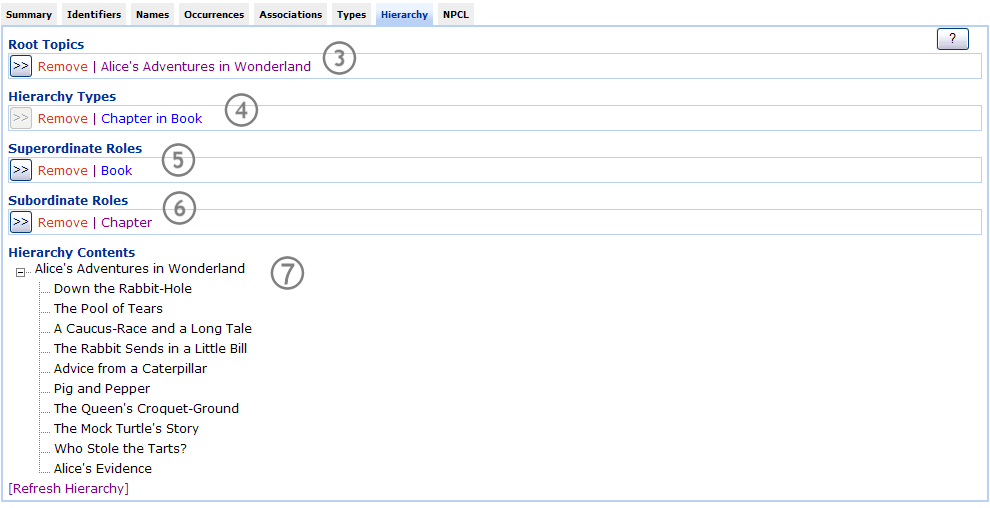
The Hierarchies Tab allows you to view and modify the hierarchy defined by a topic or to use the current topic to define a new hierarchy in the topic map.
This message is shown when the hierarchy schema topics are not loaded in to the topic map. Clicking the button will create the topics required to support hierarchies. This action is equivalent to clicking the button on the topic map details control.
In order for a topic to represent a hierarchy, it must be an instance of the topic with SI http://www.techquila.com/psi/faceted-classification/#facet topic. Clicking the button T
Root Topics topic list. With this control you can add topics to and remove topics from the list of root topics for the hierarchy. The root topics are the top level items from which the hierarchy is built. Clicking the button adds the current selection in the Selected Topics List as a root topic for the hierarchy. Clicking the Remove link next to a topic in the list will remove the topic from the list of root topics. Your changes are saved each time you add a topic to or remove a topic from the list.
Hierarchy Types topic list. This control lists the association types that are traversed to construct the hierarchy. Clicking the button adds the current selection in the Selected Topics List as a hierarchy type. Clicking the Remove link next to a topic in the list will remove the topic from the list of root topics. Your changes are saved each time you add a topic to or remove a topic from the list.
Superordinate Roles topic list. This control lists the role types that define the "parent" topic in each association traversed to construct the hierarchy. Clicking the button adds the current selection in the Selected Topics List as a superordinate role type. Clicking the Remove link next to a topic in the list will remove the topic from the list of superordinate role types. Your changes are saved each time you add a topic to or remove a topic from the list.
Subordinate Roles topic list. This control lists the role types that define the "child" topic in each association traversed to construct the hierarchy. Clicking the button adds the current selection in the Selected Topics List as a subordinate role type. Clicking the Remove link next to a topic in the list will remove the topic from the list of subordinate role types. Your changes are saved each time you add a topic to or remove a topic from the list.
Hierarchy Contents tree control. This tree control shows the contents of the hierarchy. To update this tree after making changes in any of the controls listed above, click the button.
See also How To Create A Topic Hierarchy.
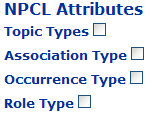
The NPCL tab allows you to change the NPCL attributes of the topic. See the Engine API Guide for more information about NPCL. This tab allows the user to configure the topic within the context of NPCL as:
A topic type, so that other topics may be an instance of this topic.
An association type. So that this topic may be used to type associations.
An occurrence type, so that this topic may be used to type occurrences attached to topics.
A role type, so that this topic may be used to define a role type in an association.
It is important to note the NPCL schema is not enforced by the Topic Map Editor (because the editor aims to be a generic topic map editing application). So you will not be prevented or warned from breaking NPCL schema constraints. It is also important to note that NPCL requires an topic participating in the schema definition to have at least one Subject Identifier associated with it. Refer to the section called “Identifiers Tab” for information on how to do this.
Each of these facilities is enabled by clicking the relevant checkbox. Each will be explained in the following sections.
Once a topic has been selected to be an NPCL topic type you are able to configure various aspects of the topic type.
Use these checkboxes to allow instances of this topic to scope Names, Occurrences and Associations.
Occurrence constraints allow the user to specify constraints set on occurrences created on instances of this topic type. You may restrict the types of occurrence created on instances as well as minimum and maximum number instance of that occurrence type for the topic to comply with the schema. Note that the button will only be enabled one an instance of an NPCL occurrence is placed in to the topic holder.
The Role Player constraints may be placed on instances of this topic. These operate in a similar way to the occurrence type constraint table. Select a topic representing an association role in which instances of this topic may act. You may also select an association type but this is not required.
Once a topic has been selected to be an NPCL association type you are able to configure the constraints of instances of this association type.
Shows a list of the existing role constraints for instances of this association type.
Shows a new association constraint being created. To enable the button a valid NPCL Role Type topic must be selected. To see a list of the choices available, use the button provided. Enter the minimum and maximum cardinality values for this constraint and click the button to create the constraint.
NPCL Occurrence Types allow the user to place constraints on occurrences where the occurrence type topic is set to the topic being edited. The interpretation of the values of the attributes of occurrence types is up to the using application and are not prescribed by NPCL.
The data type field a data type specification for this type.
The min value field specifies a minimum value that the occurrence value should have.
The max value field specifies a maximum value that the occurrence value should have.
The value pattern field specifies a regular expression string that values of this occurrence must match.
| |  | |
| Topic Selector Panel |  | How To... |